Create a video from still images using Windows Movie Maker
Images may be part of a time-lapse photo sequence or animation project. Check out Len's video.
 Instructions
- Set the camera to its lowest resolution setting (perhaps the email option)
- Download all image files into a single folder
- Open Windows Movie Maker (MM)
For help »
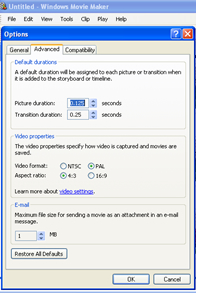
Download » Windows Movie Maker - Select Tools\Options\Advanced; Picture duration: minimum (0.125 sec); Transition duration: minimum (0.25 sec); Select OK
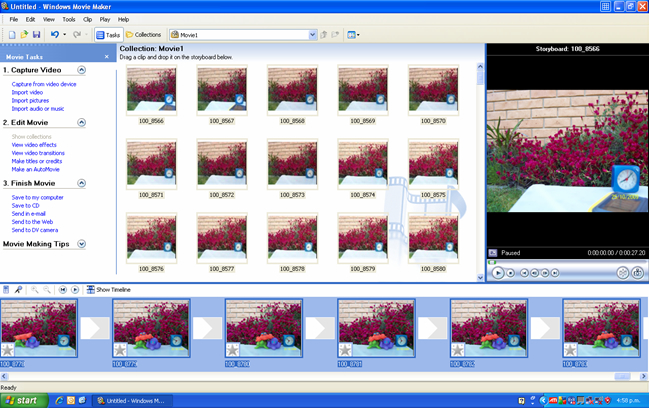
- On the left-hand panel go to 1 Capture Video\Import pictures\select the contents of the folder (may use Ctrl A to select All); Select Import
- Select all pictures from 'Collection' (Ctrl A) and drag them onto the 'Story Board'
- On the left-hand panel go to 2 Edit Movie\Make Titles or Credits (Follow prompts)
- On the left-hand panel go to 3 Finish Movie\Save to My Computer (Follow the prompts)
- Enjoy your movie
- Look for parts of the movie that work well and incorporate them into the next project. Look out Peter Jackson.
Hints:
- You may like to check the time-lapse movie on the home page of Penguin Science for some ideas.
- MovieMaker plays still photos at about 8 frames per second with the above settings. To calculate the length of time a video will run, decide on the interval between photos, calculate the number of photos per hour multiplied by the number of hours the subject will be photographed for, then divide by 8. For example a subject photographed at 3-minute intervals for 11 hours produced 220 image files which when processed through MovieMaker made a video that lasted about 25 seconds.
- Does MovieMaker take a long time or refuse to complete a movie? Try dividing the image files into sequential groups of say 100–200 individual image files, depending on the size of each file. Save each sequence as a movie. When this stage is finished, combine all the movies into a single video file by importing each movie into MovieMaker through Capture Video/Import video, and follow the MovieMaker steps to complete the movie.
- Having trouble finding project files within a folder? Try using a 'root file name', then add prefixes and suffixes to the root name. Perhaps the files may be called 'tLapse'. If more than one project is in a folder, a number prefix may help with organisation. If projects are completed over a time period, a date suffix may help. If there is more than one version of a project, a letter suffix may help. Remember, some letter/digit combinations may be confusing (0/O/o; 1/I/l; 8/B; 6/b)
1tLapse909 Two different projects 2tLapse909 3tLapseA909 (or 3tLapse909a) Versions of the same project 3tLapseB909(or 3tLapse909b) 3tLapseC909(or 3tLapse909c) - How can you change the 'speed' of events within a video? Experiment by copying certain files and importing them into the movie and placing them next to each other. What does this do to the 'speed' of the event? Perhaps the Picture duration/ Transition duration of individual/groups of files may have an effect. What happens if every second, third.. image is removed?
- You may like to animate titles and credits, check artist Len Lye, the pioneer New Zealand filmmaker at the Govett Brewster Art Gallery for some ideas.